What is white balance? Well my friends, I’m going to try to explain this in my own words. Professional photographers, you know I love you, but please flee the scene before I horrify you with my amateur and incomplete explanation!
OK, now that those guys are gone we can dive straight in. Let us begin:
Your camera measures the array of colors in an image based on what it thinks is white. For example, if you take a picture of a child sleeping on a white sheet, the camera will produce an accurate array of colors only if it recognizes that the sheet is white.
Imagine that sheet is lit by fluorescent lights (greenish or blueish tints) or incandescent lights (yellowish tints): if you don’t set your white balance, the camera can give you a yellow or green or blue-colored sheet, which means that the child’s skin will look … well, not like a healthy child’s skin should look. And who wants that? Nobody!
Your job is to tell the camera “this sheet is white. Measure the rest of the colors according to this reading of white.” And the child’s skin problems will immediately disappear (phew!).
Here is an example of food photography in which my blue cheese looked a little yellow. I was like “No, man–it’s white.” The picture above looks a bit unappetizing to me … the one below is somewhat better thanks to a more accurate white balance. Can you see the difference?
Getting a good white balance is especially important in food photography. This example illustrates it perfectly:
Some people prefer a “warm” hue to their photos (the whites are yellowish), and a “cold” hue can be appealing for other photos (the whites are bluish). Here are two examples in which I purposefully altered the white balance to produce a more interesting shot:
Out of curiosity, do you like one in particular over the other? (I will perform a 5-step psychological analysis of you based on your answer)
However great it is to play around with color balance to express your creativity, it’s good to know how to get a well-balanced and accurate color in your picture straight out of the camera, so that you don’t have to make corrections later.
If you have a DSLR (digital single-lens reflex camera), I encourage you to grab it at this point and play with it as I go through these steps. They will be slightly different depending on what you’re shooting with, but it won’t be that hard–really! I tried to make it super easy to follow by photographing my Nikon’s LCD screen with my point-and-shoot . . . but the pictures were just a bright blur. So track with me through some instructions. With my camera (Nikon D5000), this is how I set my white balance:
- Press “Menu” button
- Select “Shooting Menu” (the little camera icon)
- Select “White Balance” (6th option down).
At this point, I can select the kind of light I’m shooting in: fluorescent, direct sunlight, shade, cloudy day, incandescent, etc. This option is fine and dandy–but I prefer another way. Let’s continue . . .
- The final option under “White Balance” is called “Preset Manual”. Pick this; it will allow us to set the white balance manually. The word “manually” might send off little alarm bells in your head, but it’s only going to take about 5 seconds (literally), and it carries a distinct advantage: imagine that you’re taking a picture of your family on a couch. Since you’re inside, there are probably many different light sources going on at once. There’s a little natural light coming in from the windows, there are a couple incandescent bulbs, there’s some fluorescent light spillover coming from the kitchen, and there’s a weird-tinted energy-saving bulb (hideous). No matter how fancy your camera is, I guarantee it doesn’t have a “combo” option for this particular mixture of lights. So the solution is to simply tell the camera “This is white” by using the “Preset Manual” option. You’ll never go back, and the family-on-the-couch picture will turn out great. A word to the wise: sometimes when shooting inside, you have to alter your white balance as you move from the kitchen (usually fluorescent lighting) to the terrace (natural light) to the living room (incandescent light)–unless you’re using your fancy-schmancy external flash. But that’s another story.
- You will see 2 choices: “Measure” or “Use photo”. Pick “Measure”.
- You will get a prompt: “Overwrite existing data?” Select “Yes”.
- The next prompt says “Take photo of white or grey object filling viewfinder under lighting for shooting”. In other words, find something white (like a wall, or the back of a sheet of paper) and take a picture. The screen should now say “Data acquired” at the top of the info screen.
Ta-daa! This is the best way to get your white balance set correctly.
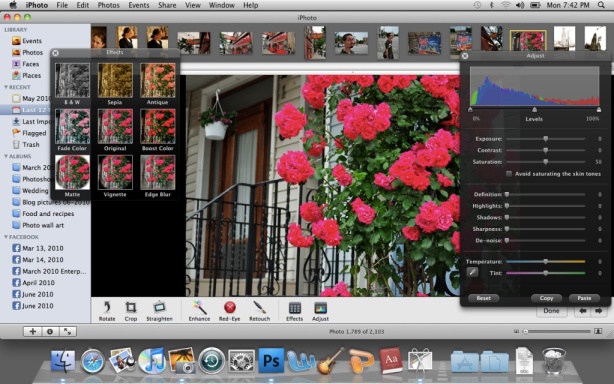
Now–what if you need to correct it after the fact? There’s an easy solution: use the color balance slider in your photo editing program (would anyone join me in 3 boisterous cheers for technology?). If you own a Mac, iphoto has color balance sliders called “temperature” and “tint”. They’re in the bottom right-hand corner:
Just drag them back and forth until you find a balance that you like.
Of course, my preferred option is Photoshop, because it allows you to play with a little more than these other programs I’ve mentioned, isolating the shadows, midtones and highlights of the picture and allowing you to adjust them independently.
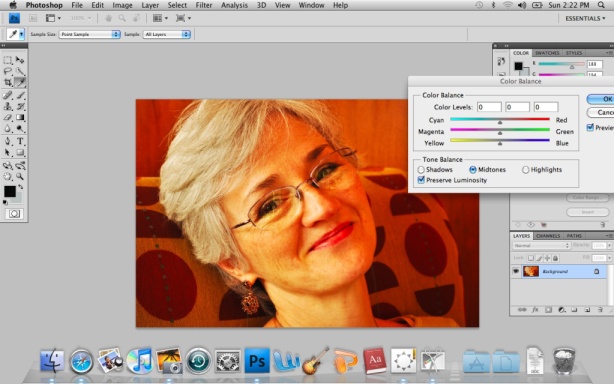
Let’s take this picture of my Mom as it came out of the camera. It has potential, but it’s way too orange/red for my taste. Her skin is practically a neon flame. My husband happens to like how that looks, but track with me for the sake of the example. Here is the original:
For some reason, uploaded to this post it looked a little better–but in the screenprint below you can see how orange it looked when I opened it in Photoshop. It was time to fix it. You can bring up your color balance slider by going to “Image”, “Adjustments” and “Color Balance”, or by hitting Command B on a Mac. You can play around with the highlights, midtones, or shadows, and you can alter each one with the 3 sliders. Options, options, options! I love options. I am sometimes paralyzed by options, but I love them.
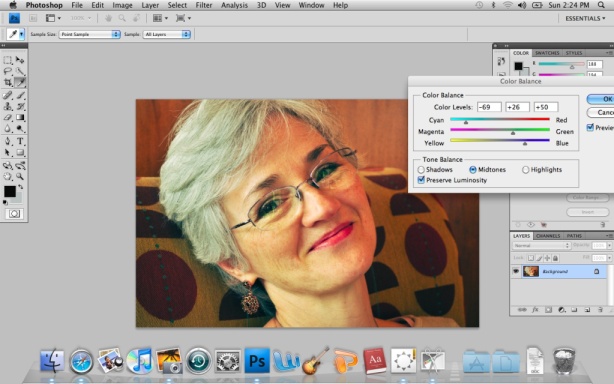
Let’s play with the sliders to get that fluorescent orange hue off my mom’s face. A little to the right … and little to the left … adding a little cyan and blue to make up for the bright orange …
And there you go. The screenprint above shows where I left the sliders at the end. She needed a LOT and I’m saying a LOT of cyan before I was happy. I like how it looks. When uploading it to this post, unfortunately it looked a lot darker and a lot browner:
. . . but if works for the sake of the example.
Aim to get good color balance SOOC (straight out of camera), but have fun playing as well. A fun adventure: purposefully pick a preset white balance such as “incandescent light” when you’re outside. Or pick “fluorescent”–see what it does to your pictures. Who knows, you may like the effect!
Now go into the world, and set your white balance manually! It will make your momma proud.


